

Blurry photos caused by shaky hands are one of the most common frustrations in photography. The good news is that camera shake is usually fixable. In most cases, you do not need a new camera—you need better technique, smarter camera settings, and a few stabilization tricks that professional photographers use every day.
Why Your Photos Are Blurry: Understanding the Real Cause
Before fixing shaky hands photography, it’s important to understand what causes blur.
Many photographers assume their camera is defective when images look soft. In reality, blur usually comes from one of three sources:
| Cause | What It Looks Like | Solution |
| Camera Shake | Entire image appears blurred | Faster shutter speed, stabilization techniques |
| Subject Motion | Moving subject is blurry while background is sharp | Faster shutter speed |
| Focus Error | Wrong part of image is sharp | Improve autofocus technique |
The focus of this article is camera shake—the small movements your hands make while pressing the shutter button.
Even healthy people experience tiny involuntary movements. Fatigue, caffeine, stress, cold weather, excitement, and age can increase these movements.
Unique Insight: Sharpness Is a Stability Problem, Not a Gear Problem
Many photographers spend thousands upgrading cameras while still shooting with poor technique.
A photographer using good stabilization techniques with an entry-level camera will often produce sharper images than someone using an expensive camera improperly.
Practical takeaway: Before buying new equipment, master the techniques in this guide.
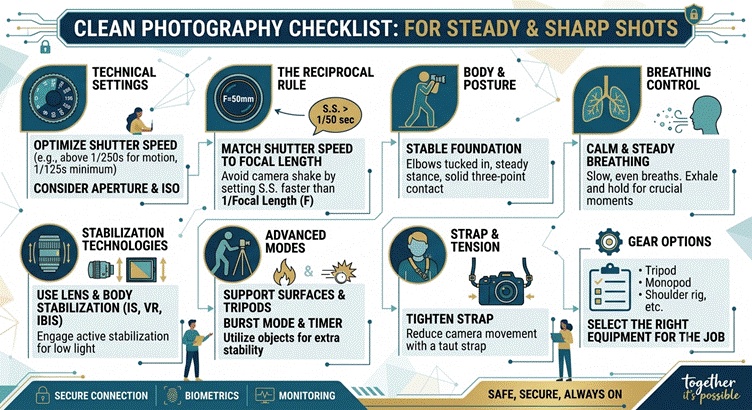
The #1 Rule That Prevents Handheld Blur: The Reciprocal Rule
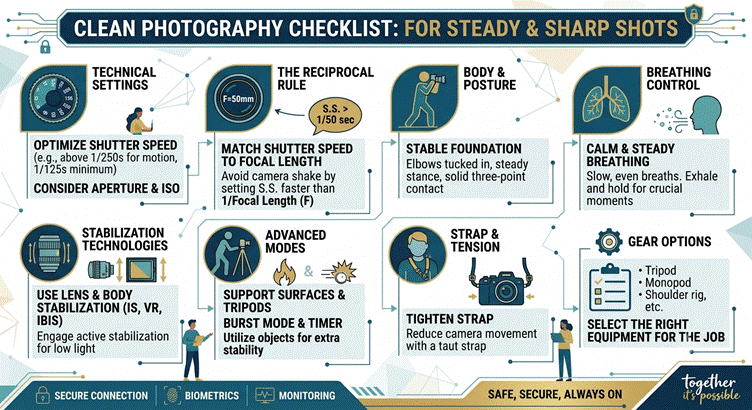
If you remember only one thing from this article, remember the Reciprocal Rule.
The rule states:
Minimum shutter speed = 1 ÷ focal length
Examples:
| Lens Focal Length | Minimum Handheld Shutter Speed |
| 24mm | 1/25 sec |
| 35mm | 1/40 sec |
| 50mm | 1/50 sec |
| 85mm | 1/100 sec |
| 135mm | 1/160 sec |
| 200mm | 1/200 sec |
| 400mm | 1/400 sec |
Why this matters:
The longer the lens, the more every tiny hand movement becomes magnified.
Imagine trying to hold a laser pointer steady:
- At 1 meter, movement seems small.
- At 100 meters, the same movement becomes dramatic.
Telephoto lenses behave similarly.
Modern Camera Adjustment
Today’s high-resolution sensors reveal blur more easily than older cameras.
A safer modern rule is:
2× the focal length
Examples:
- 50mm → 1/100 sec
- 200mm → 1/400 sec
- 400mm → 1/800 sec
This produces more consistently sharp results.
Practical takeaway: If your images are blurry, check shutter speed first. It solves more problems than any other setting.
How to Hold a Camera Properly
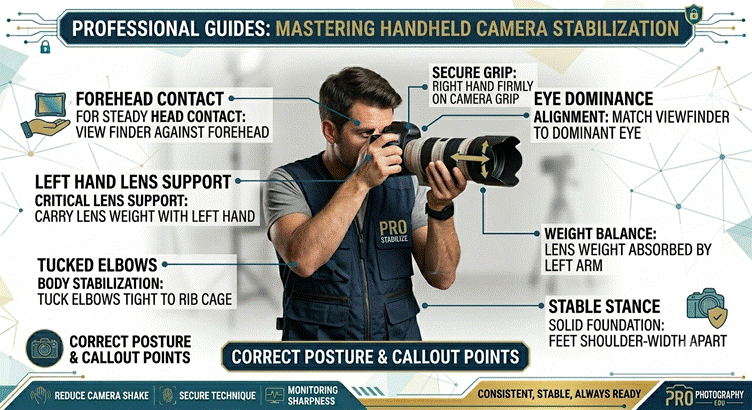
Most photographers are never taught proper camera posture.
Professional photographers create multiple points of contact between their body and the camera.
The Four-Point Stability Method
- Right hand grips camera firmly.
- Left hand supports lens from underneath.
- Elbows tucked against ribcage.
- Viewfinder pressed lightly against forehead.
Together these create a stable structure that reduces movement significantly.
The Human Tripod Technique
Stand with:
- Feet shoulder-width apart
- One foot slightly forward
- Knees relaxed
- Body balanced
Instead of relying only on your hands, you distribute stability through your entire body.
Common Mistake
Many beginners hold cameras away from their face while viewing the rear screen.
This removes one critical contact point and dramatically increases shake.
Practical takeaway: Use the viewfinder whenever possible, especially in low light.
The Sniper Breathing Technique for Sharper Photos
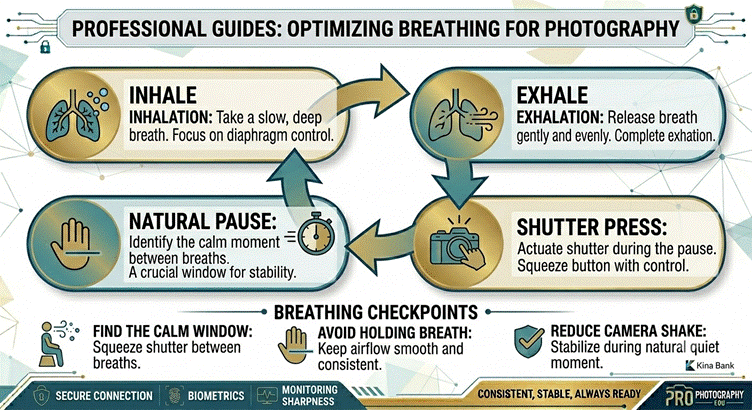
One of the least-discussed photography techniques comes from precision shooting.
Professional marksmen minimize movement through breathing control.
Photographers can do the same.
Step-by-Step
- Take a normal breath.
- Exhale gently.
- Pause briefly at the end of the exhale.
- Press the shutter smoothly.
Avoid:
- Holding a full breath
- Jabbing the shutter button
- Shooting while inhaling
Why It Works
Your chest and shoulders move continuously while breathing.
Pressing the shutter during the brief natural pause after exhaling minimizes body movement.
Real-World Example
Wildlife photographers often use this technique when shooting long telephoto lenses without support.
At 400mm or 600mm, even tiny breathing movements can reduce image sharpness.
Practical takeaway: Practice this technique for one week and compare results. Most photographers notice improvement immediately.
Stop Jabbing the Shutter Button
Many photographers accidentally create blur themselves.
The problem isn’t hand tremor.
It’s aggressive shutter presses.
Correct Technique
Think of squeezing the shutter rather than pressing it.
The movement should be:
- Smooth
- Gradual
- Controlled
Why It Matters
A sudden downward motion transfers force through the entire camera body.
This movement often causes blur exactly when the exposure begins.
Practical takeaway: Use gentle pressure and avoid stabbing at the button.
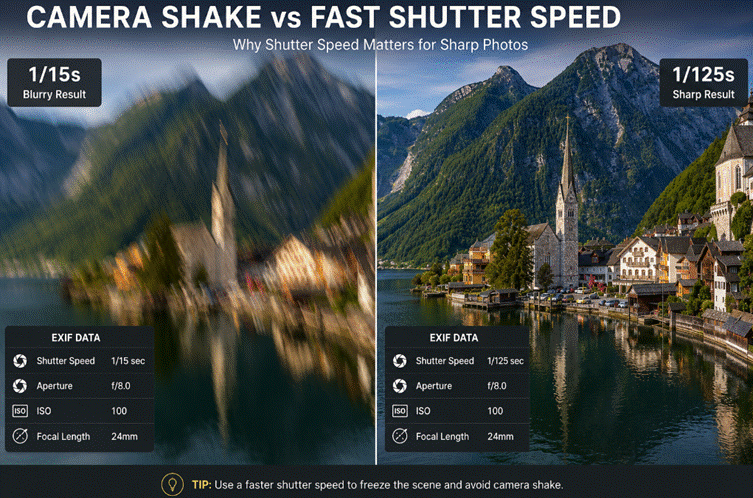
The Fastest Camera Settings Fix for Shaky Hands
When conditions become challenging, adjust settings in this order:
1. Increase Shutter Speed
This should always be your first adjustment.
Examples:
Instead of:
- 1/30 sec
- ISO 100
Try:
- 1/125 sec
- ISO 400
A slightly noisier image is usually better than a blurry image.
2. Raise ISO
Many photographers fear high ISO unnecessarily.
Modern cameras handle ISO much better than older models.
Noise can often be reduced during editing.
Motion blur usually cannot.
3. Open the Aperture
A wider aperture lets in more light.
Examples:
- f/5.6 → f/4
- f/4 → f/2.8
- f/2.8 → f/1.8
This allows faster shutter speeds.
Practical takeaway: Prioritize sharpness over perfectly clean ISO values.
Should You Turn Image Stabilization On or Off?
Many photographers are confused by stabilization systems.
You’ll encounter names such as:
- IS (Image Stabilization)
- VR (Vibration Reduction)
- OSS (Optical SteadyShot)
- OIS (Optical Image Stabilization)
- IBIS (In-Body Image Stabilization)
Different manufacturers use different names, but the goal is identical: reduce camera shake.
Turn Stabilization ON When:
- Shooting handheld
- Using telephoto lenses
- Photographing in low light
- Recording handheld video
Turn Stabilization OFF When:
- Camera is on a sturdy tripod
- Manufacturer specifically recommends disabling it
- Certain long-exposure situations
Understanding Stabilization Benefits
Modern stabilization systems often provide several stops of compensation.
For example:
Without stabilization:
- 50mm lens → 1/50 sec
With strong stabilization:
- Possible at 1/13 sec
- Sometimes even slower
Results vary depending on technique and equipment.
Hidden Reality
Stabilization reduces camera movement.
It does not freeze moving subjects.
A dancing child can still appear blurry at slow shutter speeds even if stabilization is active.
Practical takeaway: Use stabilization whenever shooting handheld unless a specific situation requires otherwise.
How to Take Sharp Photos in Low Light Without a Tripod
Low light is where camera shake becomes most visible.
Most photographers instinctively lower shutter speed too far.
Instead, use a combination of techniques.
Prioritize in This Order
- Faster shutter speed
- Stabilization
- Higher ISO
- Wider aperture
Look for Support
Use:
- Walls
- Railings
- Tables
- Trees
- Door frames
Even slight support can dramatically increase sharpness.
Shoot Bursts
Instead of taking one image:
Take 3–5 frames.
Often one frame will be noticeably sharper.
This works because natural hand movement fluctuates moment to moment.
Practical takeaway: Burst shooting is one of the easiest low-light sharpness hacks available.
The Camera Strap Trick Most Photographers Never Learn
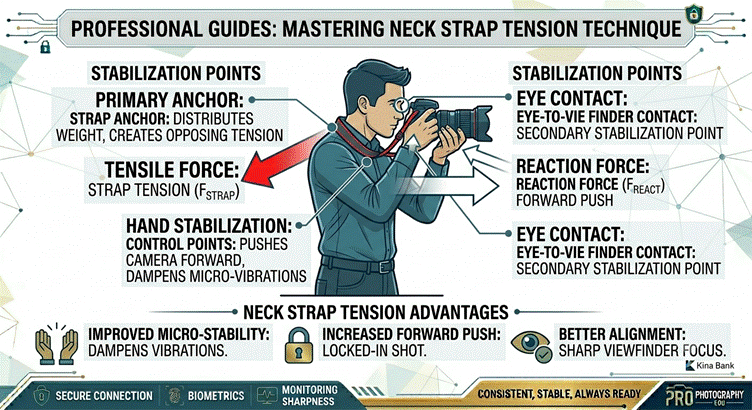
This technique creates tension that stabilizes the camera.
How It Works
- Wear neck strap normally.
- Extend camera forward.
- Pull gently against the strap tension.
- Maintain pressure while shooting.
The tension creates a more rigid shooting platform.
Why It Works
You’re effectively turning the strap into a stabilization system.
Three forces now resist movement:
- Arms
- Neck
- Strap tension
Street photographers have used this technique for decades.
Best Situations
- Travel photography
- Street photography
- Low-light handheld shooting
- Telephoto photography
Practical takeaway: This costs nothing and can noticeably improve sharpness.
Accessories That Actually Help Shaky Hands
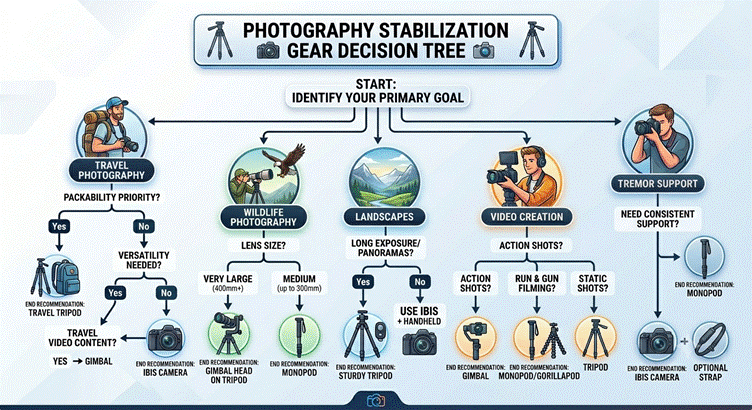
Technique should come first.
However, some tools genuinely help.
Monopod
Best for:
- Wildlife photography
- Sports photography
- Long telephoto lenses
Advantages:
- Lightweight
- Portable
- Fast to deploy
Tripod
Best for:
- Landscapes
- Architecture
- Night photography
Advantages:
- Maximum stability
- Long exposures
- Precise composition
Gimbal
Best for:
- Video creators
- Vloggers
- Walking shots
Advantages:
- Smooth motion
- Professional-looking footage
Wrist and Neck Straps
Best for:
- Everyday photography
- Travel
- Street shooting
Advantages:
- Additional stabilization
- Low cost
- Highly portable
For Photographers With Tremors
Weighted supports, monopods, tripods, and cameras with strong IBIS often provide significant assistance.
Many photographers with essential tremor continue producing exceptional work by adapting technique and equipment.
What If You Have Naturally Shaky Hands?
Some photographers experience:
- Essential tremor
- Age-related tremor
- Medication-related tremor
- Neurological conditions
Photography is still absolutely possible.
Recommended Strategy
Use:
- Faster shutter speeds
- Wider lenses
- Stabilized lenses
- Cameras with IBIS
- Monopods
- Tripods
- Burst mode
Unique Perspective
Many photographers with tremors become highly skilled at environmental and landscape photography because they learn stabilization techniques more deeply than average photographers.
The limitation often becomes a catalyst for better technical mastery.
Practical takeaway: Adapt your shooting style around your strengths rather than fighting every limitation.
Quick Troubleshooting Guide
| Problem | Most Likely Cause | Solution |
| Entire photo blurry | Camera shake | Increase shutter speed |
| Telephoto images blurry | Focal length magnifying movement | Use reciprocal rule |
| Low-light blur | Shutter speed too slow | Raise ISO |
| Video looks shaky | Lack of stabilization | Use IBIS or gimbal |
| Photos blurry despite stabilization | Subject motion | Increase shutter speed |
| Sharpness varies between shots | Natural hand movement | Use burst mode |
Frequently Asked Questions
What shutter speed stops shaky hands?
Start with the reciprocal rule:
- 50mm lens → 1/50 sec minimum
- 200mm lens → 1/200 sec minimum
For more reliable results on modern cameras, use double the focal length.
Does image stabilization eliminate hand shake?
No.
It reduces camera movement but cannot completely eliminate severe shake or freeze moving subjects.
Is a tripod always necessary?
No.
Most handheld blur can be fixed through better technique, faster shutter speeds, and stabilization systems.
Can I fix blurry photos in editing?
Minor softness can sometimes be improved.
Motion blur caused by significant camera shake usually cannot be fully repaired.
Is camera shake worse on telephoto lenses?
Yes.
Longer focal lengths magnify even tiny movements, making stabilization increasingly important.
Final Thoughts
If your photos are blurry because of shaky hands, start with technique—not gear.
Master the reciprocal rule. Increase shutter speed. Tuck your elbows. Control your breathing. Use the camera strap tension trick. Turn stabilization on when shooting handheld.
These changes often improve image sharpness far more than buying a new camera.
The photographers who consistently capture sharp handheld images are not necessarily the ones with the most expensive equipment. They are the ones who understand how to control movement, manage camera settings, and build stability into every shot.